Proxmox is a popular web-based interface that makes it easy to manage and test virtual machines. It allows you to smoothly run multiple operating systems, such as Ubuntu and Windows.
Proxmox offers several built-in features, including live migration, backup, and restore capabilities. Additionally, Proxmox is a free and open-source virtualization platform.
This article provides a step-by-step illustrated guide to creating your first virtual machine in Proxmox.
You will learn about the following key topics in this guide:
Accessing and Uploading a File to Proxmox
Creating a Virtual Machine in Proxmox
Installing an Operating System on Proxmox
Accessing and Uploading a File to Proxmox
Using these steps, you can access and upload a file (e.g., *.iso) to your Proxmox environment.
Step 1: Access Proxmox Virtual Environment
To access the Proxmox virtual environment, copy the server address (e.g., https://192.168.xx.xx:8006), open a web browser, and log in as a “root” user:

Note: If you are using Proxmox for the first time, it will ask you to enter your username and password to log into the Proxmox server. Therefore, use the “root” as a default username.
Step 2: Upload Image File
Before creating your first virtual machine in Proxmox, you must upload an operating system’s image file, such as Ubuntu-24.04.*.iso.
Follow the steps below to upload a file:
- In the “pve”, select “local (pve)”.
- Locate “ISO Images”.
- Select the “Upload” button:

Select the file path by clicking the “Select File” button, navigate to the ISO image file, and click on the “Upload” button:

Once the ISO image has been uploaded, a success message “TASK OK” will be displayed on your screen:

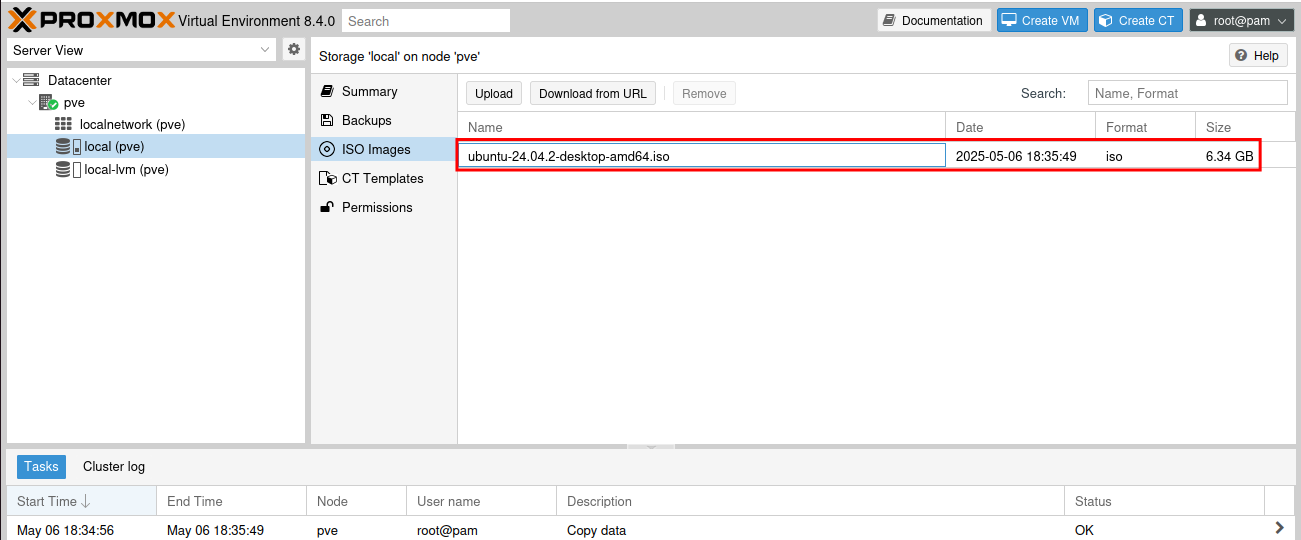
The image file, such as “ubuntu-24.04.2-desktop-amd64.iso,” is now available in your Proxmox local environment:
Creating a Virtual Machine in Proxmox
It is easy to create your first virtual machine in Proxmox. Simply follow the steps below in sequence.
Step 1: Create a Virtual Machine
Locate the “Create VM” button on the top right and click to begin creating a virtual machine:

Step 2: Name Your Virtual Machine
Enter the name for your virtual machine in the given area/field and click “Next” to continue:

Step 3: Select the Image File
Under the “OS”, select the ISO image file from the Proxmox local environment, as you have uploaded earlier:

Enter the “Next” button to proceed to the next tab, “System”.
Step 4: Set up the System’s Settings
In the “System” tab, modify the settings or leave them as the default settings:

You can enable or disable the “Qemu Agent” option according to your requirements.
Step 5: Adjust Machine Disk Size
You can easily adjust the size of your disk in the given range through the “Disks” tab, as shown below:

Proxmox will recommend a disk size for your machine, but you can increase or decrease it based on your needs.
Step 6: Set up the CPU
Proxmox allows you to adjust your CPU core and type for your virtual machine:

Note: If you don’t know about the Type, select the “host” from the dropdown list.
Step 7: Set up RAM
Allocate the RAM size (e.g., 2048 MB) for your Virtual Machine from the “Memory” tab:

It is recommended to allocate a sufficient amount of RAM to run your machine smoothly.
Step 8: Set up “Network” for Virtual Machine
You can specify the network settings according to your needs or simply leave them as default:

Step 9: Save Configuration Settings
Review your virtual machine’s configuration and save the changes by clicking the “Finish” button:

So far, you have successfully created your first virtual machine in the Proxmox virtual environment. Now, let’s install the operating system, such as Ubuntu 24.04, on it.
Installing an Operating System on Proxmox
Using the following sequential steps, you will learn how to install an operating system like Ubuntu 24.04 on your first virtual machine in Proxmox.
Step 1: Start the Virtual Machine in Proxmox
To start the newly created Virtual Machine (e.g., karim):
- First, go to the machine
- Select the “Console” tab
- Click on the “Start Now” button to start the machine:

Step 2: Install Operating System (Ubuntu 24.04)
Once the virtual machine starts, press “Enter” to begin the Ubuntu installation:

Step 3: Choose Language
From the graphical interface, choose the language for your operating system:

Step 4: Ubuntu’s Accessibility
You can personalize the accessibility settings for your machine according to your preferences:

Step 5: Keyboard Layout
Select the keyboard layout for your system according to your preferences:

Step 6: Interactive or Automated Installation
Ubuntu 24.04 allows you to select either interactive installation or automated installation.
Here, we will use the interactive installation:

Step 7: Apps Installation
If you want to keep it simple and don’t need the extra utilities and tools, select the “Default selection”:

If you want to install Office tools such as OfficeWriter, OfficeCalc, etc, then select the “Extended selection”.
Step 8: Erase the Disk
To perform a clean installation on the default disk, select “Erase disk and install Ubuntu”, and click “Next” to continue:

If you want to customize your disk partitions and size, then select the “Manual installation”. Here you will find advanced settings for your Disk management.
Step 9: Create Account
Enter your credentials in the form to create an account for your operating system:

It is important to always use a strong password for your account and not share it with others.
Step 10: Select your Timezone
Almost there, choose your timezone on the map:

Step 11: Review and Install Ubuntu
Finally, review the information you entered during the process and then click on the “Install” button to start installing the Ubuntu 24.04 operating system on your Proxmox virtual machine:

Once the installation process is complete, click on the “Restart now” button to reboot the system:

After restarting the machine, a greeting message will be shown on your screen:

As demonstrated above, we have successfully created our first virtual machine in the Proxmox environment.
FAQs
What is Proxmox?
Proxmox is a popular web-based virtualization platform that makes it easy to manage and test virtual machines. It allows you to smoothly run multiple operating systems, including Linux and Windows, on a single server.
Why is Proxmox popular for virtualization?
Proxmox is popular for virtualization because it is free, simple, and easy to use. It also provides built-in features like backups and live migration with free or minimal cost.
How to create a virtual machine on Proxmox?
To create a virtual machine:
- Log in to the Proxmox web interface using the server IP,
- Navigate to and click “Create VM”.
- Follow the steps to configure a virtual machine.
How can I upload files to the Proxmox environment?
In the Proxmox environment:
- Go to the storage (e.g., local (pve)).
- Select the image file from your local drive using “ISO Images”.
- Click on the “Upload” button to upload a file.
Conclusion
You can easily create your first virtual machine on Proxmox by following this guide. Start by accessing the Proxmox environment through a web browser, then proceed to create your virtual machine. In a Proxmox environment, you can manage and test various operating systems, such as Ubuntu 24.04.